A Journey Through the World of Pierogi: From Humble Beginnings to Culinary Delights
Related Articles
- A Love Story In A Bowl: The Enduring Allure Of Pasta Carbonara
- A Dive Into The World Of Kimchi: From Spicy Ferment To Flavorful Dishes
- A Sweet Symphony: Exploring The World Of Gelato In Italy
- A Bite Of Austria: Unraveling The Secrets Of Wiener Schnitzel
- Cajun And Creole Cooking: Spicing Up Your Kitchen With Gumbo And Jambalaya
Introduction
Uncover the latest details about A Journey Through the World of Pierogi: From Humble Beginnings to Culinary Delights in this comprehensive guide.
A Journey Through the World of Pierogi: From Humble Beginnings to Culinary Delights

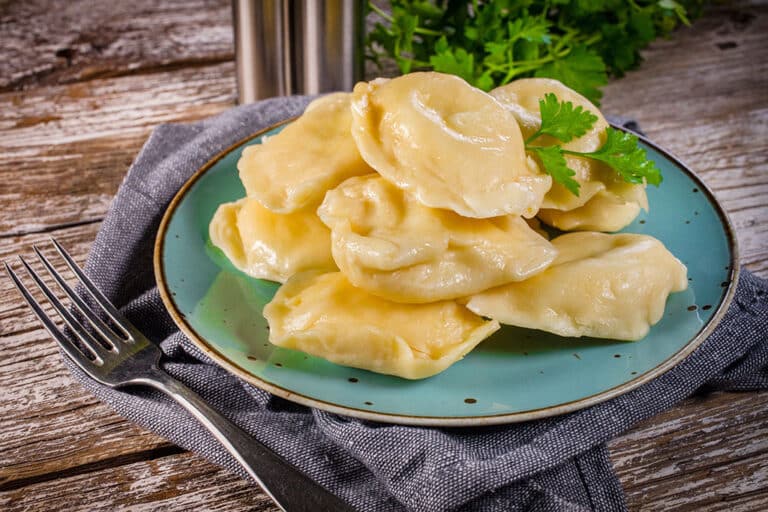
Pierogi, those delightful little pockets of dough filled with savory and sweet treasures, are a culinary staple in Poland and beyond. These dumplings, often referred to as "Polish ravioli," hold a special place in the hearts and stomachs of many, their history intertwined with tradition, comfort, and the simple joy of good food. This journey will take you through the fascinating history of pierogi, explore the diverse world of fillings, and guide you step-by-step in crafting your own perfect pierogi.
A History Steeped in Tradition
The origins of pierogi, like many beloved dishes, are shrouded in the mists of time. While definitive proof is scarce, evidence suggests they have been enjoyed in Eastern Europe for centuries. Some believe they evolved from similar dumplings found in China and the Middle East, brought to Europe by traders and travelers. Others trace their lineage to the nomadic tribes of Central Asia, who carried their culinary traditions across vast distances.
Regardless of their precise origin, pierogi quickly became an integral part of Polish cuisine. They were often served during religious holidays and special occasions, symbolizing abundance and good fortune. Farmers and peasants would prepare large batches of pierogi, preserving them for long winter months when fresh ingredients were scarce. This practical aspect further cemented their place in Polish culture, transforming them into a symbol of resilience and resourcefulness.
The Art of the Dough: A Foundation for Flavor
The foundation of every delicious pierogi is its dough. It’s a simple blend of flour, water, eggs, and sometimes a touch of oil or butter. This seemingly basic recipe, however, holds the potential for endless variations, each offering a unique texture and character.
Understanding the Dough:
- Flour: The choice of flour influences the dough’s texture. All-purpose flour is the most common, resulting in a pliable dough that holds its shape well. For a lighter, airier pierogi, consider using a blend of all-purpose and cake flour.
- Eggs: Eggs add richness and elasticity to the dough. The number of eggs can vary depending on the desired texture. More eggs create a firmer, more resilient dough, while fewer eggs result in a softer, more delicate dough.
- Water: The amount of water used in the dough is crucial for achieving the right consistency. Too much water will make the dough sticky and difficult to work with, while too little will result in a dry, crumbly dough.
- Fat: A small amount of oil or butter, added to the dough, enhances its flavor and helps prevent it from drying out.

Mastering the Dough:
- Kneading: Kneading is essential for developing the gluten in the flour, resulting in a smooth, elastic dough. The amount of kneading depends on the flour type and the desired texture. A general rule of thumb is to knead for about 10 minutes, or until the dough is smooth and springy.
- Resting: After kneading, the dough needs to rest. This allows the gluten to relax, making it easier to roll out and shape. The dough should rest for at least 30 minutes, covered with a damp cloth to prevent it from drying out.
Crafting Variations:
- Adding Flavor: For a richer, more flavorful dough, you can incorporate herbs like dill or parsley, or spices like paprika or cumin.
- Experimenting with Gluten-Free Options: For those with dietary restrictions, you can substitute gluten-free flour blends to create delicious gluten-free pierogi.
A Symphony of Fillings: From Savory to Sweet

The true magic of pierogi lies in its versatility. The fillings, a canvas of flavors and textures, are where creativity truly shines. Whether you prefer savory or sweet, there’s a filling to tantalize your taste buds.
Savory Delights:
- Classic Potato and Cheese: A timeless favorite, this filling is a simple blend of mashed potatoes, cheese (typically farmer’s cheese or ricotta), and seasonings like salt, pepper, and onion.
- Mushroom and Sauerkraut: A symphony of earthy flavors, this filling combines sautéed mushrooms with tangy sauerkraut, often enhanced with caraway seeds and bacon for extra depth.
- Meat Fillings: From ground beef and pork to lamb and chicken, meat fillings offer a hearty and satisfying experience. They are often seasoned with traditional spices like paprika, marjoram, and garlic.
- Cabbage and Rice: A vegetarian option that’s both satisfying and budget-friendly, this filling combines sautéed cabbage with cooked rice, often seasoned with dill and caraway seeds.
- Spinach and Feta: A fresh and vibrant filling, this combination of sautéed spinach and tangy feta cheese is a delightful explosion of flavors.
Sweet Indulgences:
- Fruit Fillings: Fresh or dried fruits like blueberries, cherries, plums, and apricots are popular choices for sweet pierogi. They are often sweetened with sugar and enhanced with spices like cinnamon and nutmeg.
- Cheese and Fruit: A unique combination of sweet and savory, this filling blends cheese (typically farmer’s cheese or ricotta) with fruit, creating a harmonious balance of flavors.
- Chocolate: For the ultimate indulgence, chocolate fillings offer a rich and decadent treat. They are often paired with nuts or dried fruit for added texture and flavor.
The Art of Shaping: Transforming Dough into Delight
Once you have your dough and fillings ready, it’s time to shape your pierogi. This seemingly simple process requires a bit of patience and finesse, but the results are well worth the effort.
Folding Techniques:
- Crescent: The most common shape, this method involves folding a circle of dough in half to create a crescent. The edges are then pinched together to seal the filling.
- Square: This shape is created by folding a square of dough in half diagonally, then pinching the edges together to create a triangular shape.
- Half-Moon: A more elaborate shape, this method involves folding a circle of dough in half, then pinching the edges together to create a half-moon shape. The ends of the half-moon are then folded over and pinched to create a decorative design.
Tips for Shaping:
- Use a rolling pin: Rolling out the dough to an even thickness ensures that all the pierogi cook evenly.
- Cut with a cookie cutter: Using a cookie cutter to cut out the dough circles or squares ensures uniform shapes.
- Moisten the edges: Before sealing the dough, moisten the edges with water. This helps the dough to stick together and prevents the filling from leaking out during cooking.
- Use a fork to crimp the edges: Crimping the edges of the pierogi with a fork not only seals the filling but also creates a decorative design.
Cooking Techniques: From Stovetop to Oven
The final stage of the pierogi journey is cooking. There are several methods for preparing these delightful dumplings, each offering a unique texture and flavor profile.
Boiling:
- Simple and Versatile: Boiling is the most common method for cooking pierogi. It’s a simple and versatile technique that allows you to cook large batches of pierogi quickly.
- Tips for Boiling: Bring a large pot of salted water to a boil. Add the pierogi to the boiling water in batches to prevent overcrowding. Cook until the pierogi float to the surface, indicating that they are cooked through.
- Variations: You can add a spoonful of oil or butter to the boiling water to prevent the pierogi from sticking together.
Frying:
- Crispy Delights: Frying adds a crispy exterior to the pierogi, enhancing their texture and flavor.
- Tips for Frying: Heat a generous amount of oil in a large skillet over medium heat. Add the pierogi to the hot oil and cook until golden brown and crispy on both sides.
- Variations: You can fry the pierogi in butter or a blend of oil and butter for a richer flavor.
Baking:
- Oven-Baked Goodness: Baking offers a healthier alternative to frying, resulting in tender and flavorful pierogi.
- Tips for Baking: Preheat the oven to 375 degrees Fahrenheit (190 degrees Celsius). Place the pierogi in a baking dish and brush with melted butter or oil. Bake for 20-25 minutes, or until golden brown and heated through.
- Variations: You can add additional ingredients to the baking dish, such as chopped onions, bacon, or vegetables, for a more flavorful and satisfying meal.
Flavorful Finish: From Sauces to Toppings
The final step in the pierogi journey is adding the finishing touches. Sauces and toppings can transform your pierogi from simple dumplings into culinary masterpieces.
Sauces:
- Sour Cream: A classic accompaniment, sour cream adds a tangy and creamy flavor to the pierogi.
- Butter and Onions: A simple but effective sauce, melted butter and sautéed onions add a rich and savory flavor.
- Mushroom Sauce: A creamy and flavorful sauce, mushroom sauce is a perfect complement to both savory and sweet pierogi.
- Tomato Sauce: A versatile sauce, tomato sauce can be customized with herbs and spices to create a variety of flavor profiles.
Toppings:
- Fried Onions: Crispy fried onions add a delightful crunch and savory flavor to the pierogi.
- Bacon Crumbles: Bacon crumbles add a smoky and salty flavor to the pierogi.
- Fresh Herbs: Fresh herbs like dill, parsley, chives, and mint add a touch of freshness and aroma to the pierogi.
- Cheese: Shredded cheese, such as cheddar, mozzarella, or Parmesan, adds a creamy and salty flavor to the pierogi.
Culinary Tips for Pierogi Perfection
- Use fresh ingredients: The quality of the ingredients will greatly influence the flavor of your pierogi.
- Season generously: Don’t be afraid to season your fillings and dough generously.
- Cook evenly: Make sure that all the pierogi are cooked evenly to prevent some from being undercooked or overcooked.
- Serve immediately: Pierogi are best served immediately after cooking.
- Store leftovers properly: Leftover pierogi can be stored in the refrigerator for up to 3 days. They can also be frozen for up to 3 months.
Pierogi Beyond the Plate: A Culinary Canvas
Pierogi are not just a delicious dish, they are a culinary canvas upon which you can paint your own flavors and textures. Here are some ideas for crafting diverse meals around pierogi:
- Pierogi as Appetizers: Serve bite-sized pierogi as appetizers at your next party.
- Pierogi as Main Course: Pair pierogi with a simple salad or a hearty soup for a satisfying main course.
- Pierogi as a Side Dish: Serve pierogi as a side dish alongside grilled meats, poultry, or fish.
- Pierogi in Salads: Add cooked pierogi to salads for a unique twist on a classic dish.
- Pierogi in Soups: Drop cooked pierogi into your favorite soup for a hearty and flavorful meal.
Embracing the Tradition, Creating Your Own Legacy
The world of pierogi is a world of endless possibilities. It’s a world where tradition meets innovation, where simple ingredients transform into culinary masterpieces, and where each bite tells a story of comfort, culture, and the simple joy of good food. So, embrace the tradition, explore the possibilities, and create your own legacy of pierogi perfection.
Closure
Thank you for reading! Stay with us for more insights on A Journey Through the World of Pierogi: From Humble Beginnings to Culinary Delights.
Make sure to follow us for more exciting news and reviews.
Feel free to share your experience with A Journey Through the World of Pierogi: From Humble Beginnings to Culinary Delights in the comment section.
Stay informed with our next updates on A Journey Through the World of Pierogi: From Humble Beginnings to Culinary Delights and other exciting topics.


